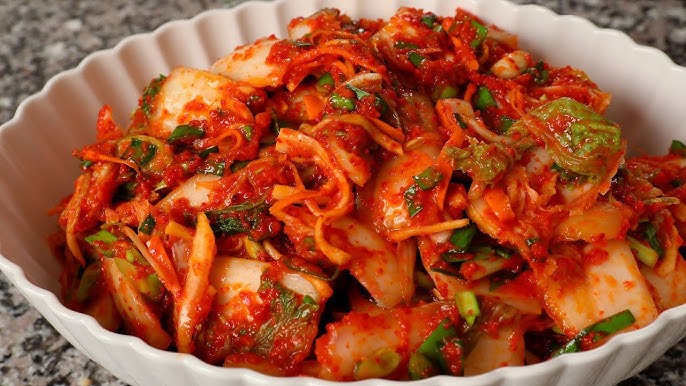
Ingredients
Main Vegetable
- 1 large napa cabbage (about 5 to 6 pounds)
Choose a cabbage that feels heavy and has crisp, pale leaves.
Salting Ingredients
- 1/2 cup coarse sea salt or kosher salt
Do not use iodized salt, as it interferes with fermentation. - Cold water, as needed
Kimchi Paste Ingredients
- 1/2 cup Korean red chili flakes (gochugaru)
Adjust quantity for mild or spicy kimchi. - 1 tablespoon sugar or rice syrup
Helps balance spice and feeds fermentation. - 1 tablespoon grated fresh ginger
- 6 to 8 cloves garlic, finely minced
- 1/4 cup fish sauce
Anchovy sauce is traditional. Use soy sauce for vegetarian kimchi. - 2 tablespoons salted shrimp (saeujeot), finely chopped
Optional but traditional.
Optional Vegetables
- 1 cup julienned daikon radish
- 3 green onions, cut into 1-inch pieces
- 1 small carrot, julienned
Equipment Needed
- Large bowl or basin
- Colander
- Clean kitchen gloves
- Large mixing bowl
- Glass jars or fermentation container
- Clean weights or small jar for pressing vegetables
Preparation Steps
Step 1: Prepare the Cabbage
Cut the napa cabbage lengthwise into quarters. Remove the hard core at the base. Cut each quarter into large bite-sized pieces or leave in long sections for traditional-style kimchi.
Place cabbage into a large bowl.
Step 2: Salt the Cabbage
Sprinkle salt evenly between the cabbage layers, focusing on thicker white parts.
Add enough cold water to barely cover the cabbage.
Let the cabbage sit for 1 1/2 to 2 hours, turning every 30 minutes. This process draws out moisture, softens the cabbage, and creates the proper environment for fermentation.
When ready, the cabbage should bend easily without breaking.
Step 3: Rinse and Drain
Rinse the cabbage thoroughly under cold running water 2 to 3 times to remove excess salt.
Drain in a colander for at least 20 minutes. Excess water can dilute the kimchi paste.
Step 4: Make the Kimchi Paste
In a large mixing bowl, combine:
- Gochugaru
- Sugar or rice syrup
- Garlic
- Ginger
- Fish sauce
- Salted shrimp
Mix thoroughly until a thick, vivid red paste forms.
Add radish, carrot, and green onions if using, and mix until evenly coated.
Step 5: Combine Cabbage and Paste
Put on kitchen gloves to protect your hands.
Add drained cabbage to the bowl with the kimchi paste.
Using your hands, gently but thoroughly massage the paste into every piece of cabbage. Take your time to ensure even coverage.
The mixture should look glossy and well-seasoned.
Fermentation Process
Step 6: Pack the Kimchi
Transfer the kimchi into clean glass jars or fermentation containers.
Press down firmly to remove air pockets and ensure the cabbage is submerged in its own juices.
Leave at least 1 inch of space at the top to allow for expansion.
Seal loosely or use a fermentation lid.
Step 7: Ferment at Room Temperature
Place the jars at room temperature, out of direct sunlight.
Let ferment for 1 to 2 days, depending on room temperature and desired sourness.
Open the jar once daily to release built-up gas and press the kimchi down if needed.
Step 8: Refrigeration and Aging
Once the kimchi reaches your preferred level of fermentation, move it to the refrigerator.
Kimchi continues to ferment slowly in the fridge and develops deeper flavor over time.
It is ready to eat immediately but improves after one to two weeks.
Serving Suggestions
Kimchi can be served:
- As a side dish with rice and soups
- In kimchi fried rice
- In stews such as kimchi jjigae
- With noodles, eggs, or grilled meats
- As a topping for bowls and sandwiches