Ingredients
For the pork chops
- 4 bone-in pork chops (about 1 to 1.5 inches thick)
- 2 tablespoons olive oil
- 1 tablespoon unsalted butter
- Salt (to taste)
- Freshly ground black pepper (to taste)
For the brown sugar glaze
- 1/2 cup brown sugar (light or dark, depending on preference)
- 2 tablespoons soy sauce
- 1 tablespoon Dijon mustard
- 3 cloves garlic, finely minced
- 1/2 teaspoon smoked paprika
- 1/2 teaspoon onion powder
- 1/4 teaspoon black pepper
- 1 tablespoon apple cider vinegar
- 1/4 cup water or chicken broth
Optional additions for depth
- 1/2 teaspoon chili flakes (for subtle heat)
- 1 teaspoon fresh thyme leaves or 1/2 teaspoon dried thyme
Equipment
- Large skillet (preferably cast iron)
- Tongs
- Small mixing bowl
- Spoon or whisk
- Plate for resting meat
Preparation Steps
Step 1: Preparing the pork chops
Start by removing the pork chops from the refrigerator about 20–30 minutes before cooking. Allowing them to come closer to room temperature ensures even cooking.
Pat each pork chop dry with paper towels. This step is often overlooked, but it is essential. Removing surface moisture helps achieve a proper sear.
Season both sides generously with salt and freshly ground black pepper. Do not rush this step—seasoning is foundational to the final flavor.
Step 2: Preparing the glaze
In a small bowl, combine:
- Brown sugar
- Soy sauce
- Dijon mustard
- Minced garlic
- Smoked paprika
- Onion powder
- Black pepper
- Apple cider vinegar
- Water or broth
Whisk thoroughly until the mixture is smooth and cohesive. The brown sugar should be mostly dissolved, forming a thick but pourable sauce.
Set aside. This mixture will later transform into a rich, sticky glaze.
Step 3: Heating the pan
Place your skillet over medium-high heat. Allow it to heat for a few minutes before adding oil. A properly heated pan is crucial for a good sear.
Add the olive oil. Once it shimmers slightly, add the butter. Let the butter melt completely and begin to foam gently.
Step 4: Searing the pork chops
Carefully place the pork chops into the skillet. Lay them away from you to avoid splatter.
Let them cook undisturbed for about 3–4 minutes on the first side. Do not move them prematurely. This uninterrupted contact allows a golden-brown crust to develop.
Flip the pork chops using tongs. Cook the second side for another 3–4 minutes.
At this stage, the pork chops should be nicely browned but not fully cooked through.
Step 5: Adding the glaze
Reduce the heat to medium.
Pour the prepared brown sugar mixture into the skillet. As it heats, it will begin to bubble and thicken.
Use a spoon to gently coat the pork chops with the sauce. Continue cooking for another 4–6 minutes, turning the chops occasionally and spooning the glaze over them repeatedly.
This process builds layers of flavor and helps the glaze adhere beautifully.
Step 6: Monitoring doneness
The pork chops are done when:
- They reach an internal temperature of about 63°C (145°F), followed by resting
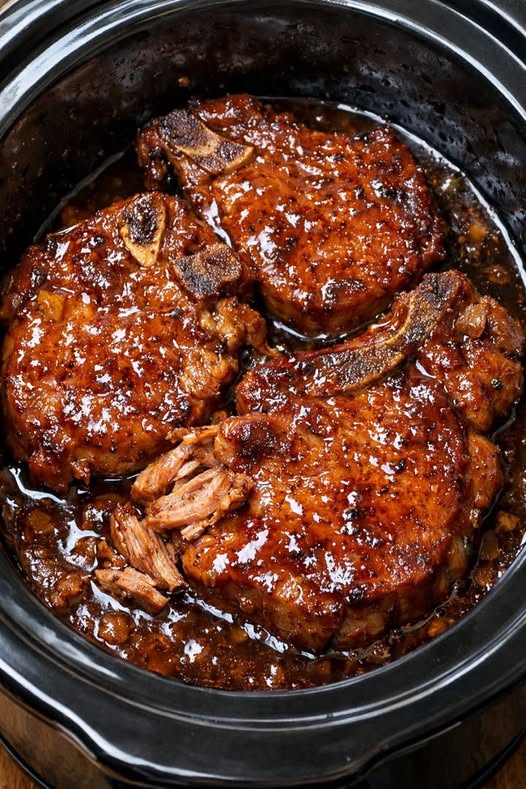
- The glaze has thickened into a glossy, slightly sticky coating
- The meat feels firm but still slightly springy when pressed
Avoid overcooking, as pork can quickly become dry.
Step 7: Resting the meat
Transfer the pork chops to a plate and let them rest for 5 minutes.
This allows the juices to redistribute throughout the meat, ensuring each bite is tender and moist.
Meanwhile, if desired, let the remaining sauce in the pan simmer for another minute to thicken further.
Serving Suggestions
Serve the pork chops with extra glaze spooned over the top.
They pair especially well with:
- Mashed potatoes
- Steamed rice
- Roasted vegetables
- Buttered green beans
The sweetness of the glaze contrasts nicely with simple, savory sides.
Flavor Notes and Adjustments
- For a deeper molasses flavor, use dark brown sugar.
- For a sharper edge, increase the vinegar slightly.
- For heat, add chili flakes or a dash of hot sauce.
- For extra richness, finish with a small knob of butter stirred into the glaze.
Final Thoughts
This recipe may seem long, but each step serves a purpose. The goal is not complexity for its own sake, but clarity and consistency. By following each stage carefully—from drying the meat to resting it at the end—you ensure that the final dish is not just good, but reliably excellent.
If you want, I can also give you a quicker version, an oven-baked variation, or a version tailored to ingredients you already have.