Section 1: Ingredients (Measured Precisely)
For the Peanut Butter Base
• 1 cup (226 g) unsalted butter
• 1 cup (250 g) creamy peanut butter
• 2 cups (240 g) powdered sugar (sifted if clumpy)
• 2 cups (240 g) fine graham cracker crumbs
• 1 teaspoon vanilla extract
• 1/4 teaspoon fine salt (only if using unsalted butter)
For the Chocolate Topping
• 1 1/2 cups (270 g) semi-sweet chocolate chips
• 1/4 cup (60 g) creamy peanut butter
Important Note:
Use regular commercial creamy peanut butter for best structure. Natural peanut butter can separate and make the base oily.
━━━━━━━━━━━━━━━━━━━━━━━━━━━━━━━━━━
Section 2: Equipment Preparation
Before beginning, gather:
• 9 x 13 inch baking pan
• Parchment paper
• Large mixing bowl
• Microwave-safe bowl
• Rubber spatula
• Measuring cups or kitchen scale
• Sharp knife
Proper preparation prevents mistakes later.
━━━━━━━━━━━━━━━━━━━━━━━━━━━━━━━━━━
Section 3: Preparing the Pan Correctly
Step 1
Cut parchment paper long enough to line the bottom and extend over two sides of the pan.
Step 2
Press it firmly into the corners. If needed, lightly grease the pan first to help it stick.
Why This Matters:
The parchment overhang allows you to lift the entire slab out cleanly before slicing. Without it, the bars may crack during removal.
Set the prepared pan aside.
━━━━━━━━━━━━━━━━━━━━━━━━━━━━━━━━━━
Section 4: Melting the Butter Properly
Step 3
Place butter in a microwave-safe bowl.
Step 4
Heat in 20–30 second intervals until fully melted.
Step 5
Allow the butter to cool for 3–5 minutes.
Important Texture Rule:
Butter should be melted but not hot. If it is steaming or very hot, it can make the mixture greasy and overly soft.
━━━━━━━━━━━━━━━━━━━━━━━━━━━━━━━━━━
Section 5: Creating the Peanut Butter Base
Step 6: Combine Wet Ingredients
In a large bowl, mix together:
• Melted butter
• Peanut butter
• Vanilla
• Salt (if using)
Stir until smooth and glossy. No streaks of butter should remain.
Step 7: Add Powdered Sugar Gradually
Add one cup at a time, stirring slowly.
Mix thoroughly before adding the next cup.
Why Gradual Mixing Is Important:
Adding everything at once can create lumps and uneven sweetness.
Step 8: Add Graham Cracker Crumbs
Add crumbs in two portions.
Mix until the texture becomes thick and cohesive.
Scrape the bowl sides to ensure even blending.
━━━━━━━━━━━━━━━━━━━━━━━━━━━━━━━━━━
Section 6: Texture Checkpoint (Critical Step)
At this stage, the mixture should:
• Feel like soft cookie dough
• Hold together when pressed
• Not feel greasy
• Not crumble when squeezed
If Too Soft:
Add 1–2 tablespoons graham crumbs.
If Too Dry:
Add 1 tablespoon melted butter.
This balance determines whether your bars will slice perfectly or fall apart.
━━━━━━━━━━━━━━━━━━━━━━━━━━━━━━━━━━
Section 7: Pressing the Base into the Pan
Step 9
Transfer mixture into prepared pan.
Step 10
Spread evenly with a spatula.
Step 11
Place parchment over the top and press firmly using your hands or the bottom of a flat measuring cup.
Press harder than you think necessary.
Why Firm Pressing Is Essential:
Loose packing causes crumbly bars.
Step 12
Ensure corners are level and compact.
Set aside.
━━━━━━━━━━━━━━━━━━━━━━━━━━━━━━━━━━
Section 8: Preparing the Chocolate Topping
Step 13
Combine chocolate chips and peanut butter in a microwave-safe bowl.
Step 14
Microwave for 20 seconds. Stir.
Step 15
Continue heating in 15–20 second intervals, stirring after each round.
Stop when chocolate is almost melted. Stir until fully smooth.
Important:
Do not overheat. Overheated chocolate becomes dull and thick.
Correct Texture:
• Smooth
• Glossy
• Easily spreadable
━━━━━━━━━━━━━━━━━━━━━━━━━━━━━━━━━━
Section 9: Assembling the Bars
Step 16
Pour chocolate mixture over peanut butter base.
Step 17
Spread gently and evenly with a spatula.
Step 18
Tap pan lightly on the counter to remove air bubbles.
Optional Addition:
Sprinkle flaky sea salt while chocolate is still wet.
━━━━━━━━━━━━━━━━━━━━━━━━━━━━━━━━━━
Section 10: Chilling for Proper Structure
Step 19
Refrigerate for 1–2 hours minimum.
Do not rush this step.
Bars are ready when:
• Chocolate is fully firm
• Center feels solid when pressed
• Edges slightly pull from parchment
For Faster Setting:
Freeze for 30–40 minutes.
━━━━━━━━━━━━━━━━━━━━━━━━━━━━━━━━━━
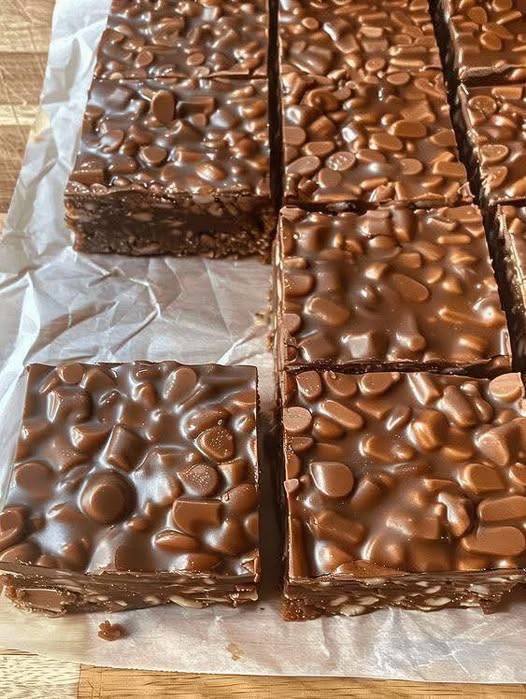
Section 11: Cutting Clean, Professional Slices
Step 20
Remove from refrigerator and let sit 10 minutes.
This prevents chocolate cracking.
Step 21
Lift slab out using parchment overhang.
Step 22
Place on flat cutting surface.
Step 23
Use a large sharp knife. Press down firmly in one motion.
Step 24
Wipe knife clean between cuts for sharp edges.
Cutting Guide:
• 4 rows by 6 rows = 24 bars
• 4 rows by 4 rows = 16 large bars
━━━━━━━━━━━━━━━━━━━━━━━━━━━━━━━━━━
Section 12: Final Texture Expectations
Perfect bars should:
• Have a glossy chocolate surface
• Hold shape when lifted
• Be firm but slightly soft when bitten
• Taste rich and balanced
• Not crumble or feel greasy
━━━━━━━━━━━━━━━━━━━━━━━━━━━━━━━━━━
Section 13: Storage Instructions
Refrigerator
Store in airtight container up to 7 days.
Freezer
Freeze up to 2 months. Separate layers with parchment.
Room Temperature
Safe for several hours, but may soften in warm conditions.