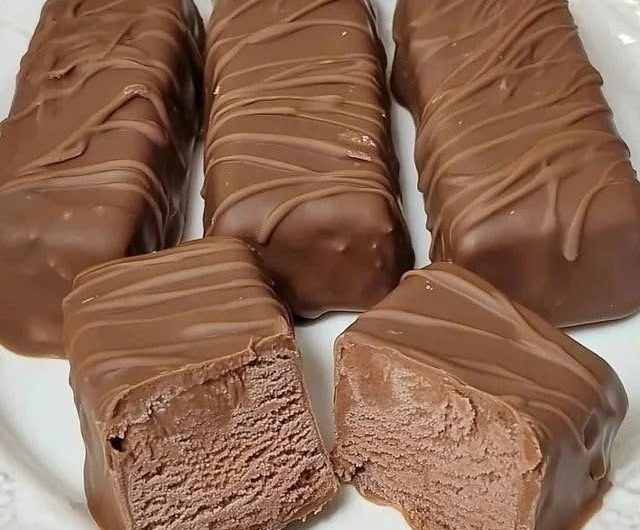
Keto-friendly 3 Musketeers candy bars are a delicious homemade version of the classic chocolate-covered candy bar, featuring a soft, fluffy, sweet chocolate mousse center surrounded by a smooth, rich chocolate coating. This low-carb recipe is designed for people following a ketogenic lifestyle who want to enjoy a chocolate treat without traditional sugar, corn syrup, or high-carb nougat.
The secret to making these homemade keto candy bars taste similar to the original is creating a light and airy chocolate filling, sweetening it with a keto-friendly sweetener, chilling it until firm, and dipping it in a thin layer of sugar-free chocolate. The result is a rich, chocolatey dessert with a creamy, almost marshmallow-like center and a satisfying chocolate shell.
This recipe is suitable for a homemade keto dessert, a low-carb afternoon snack, a special sweet treat after dinner, or a make-ahead dessert to keep in the refrigerator or freezer. Although the texture will not be exactly identical to commercial 3 Musketeers bars, this version captures their characteristic fluffy chocolate center and chocolate-covered appearance.
Recipe Overview

Fluffy chocolate center

Sugar-free chocolate shell
- Preparation time: 30–40 minutes
- Chilling time: 2–4 hours, plus additional setting time if needed
- Total time: approximately 3–5 hours
- Yield: 8–10 homemade candy bars
- Difficulty: Moderate
- Cooking method: No-bake filling with gently melted chocolate
- Diet: Keto-friendly, low-carb, gluten-free when using suitable ingredients
- Recommended storage: Refrigerated or frozen
Ingredients for the Keto Chocolate Nougat Center
The center is the most important part of this recipe because it gives the candy bars their signature soft, airy, chocolate mousse texture.
- 1 cup heavy whipping cream, very cold
- 4 ounces (113 g) cream cheese, softened to room temperature
- 3 tablespoons unsweetened cocoa powder
- 3–4 tablespoons powdered keto sweetener, adjusted to taste
- 1 teaspoon pure vanilla extract
- 1/4 teaspoon fine salt
- 1/2 teaspoon espresso powder, optional, for a deeper chocolate flavor
- 1 teaspoon unflavored gelatin, optional, for a firmer, more stable filling
- 1 tablespoon cold water, if using gelatin
Choose a powdered sweetener based on erythritol, allulose, or a monk-fruit blend. Powdered sweetener usually produces a smoother filling than granulated sweetener. Check the package label because some products contain added sugar or high-carbohydrate fillers.
For the lightest center, use heavy whipping cream with a high fat content and whip it until it forms firm peaks. The softened cream cheese adds structure and helps the filling hold its shape after chilling.
Ingredients for the Keto Chocolate Coating
The coating creates the thin, crisp chocolate exterior that makes these candy bars feel more like traditional chocolate-covered candy.
- 8 ounces (227 g) sugar-free dark chocolate, chopped, or sugar-free chocolate chips
- 1–2 tablespoons refined coconut oil or cocoa butter
- 1/2 teaspoon vanilla extract, optional
- A small pinch of salt, optional
Use a sugar-free chocolate that you enjoy eating on its own. Dark chocolate with approximately 70–90% cocoa can work well if its nutrition label fits your carbohydrate target. Sugar-free chocolate chips are convenient, while chopped sugar-free chocolate bars often melt into a smoother coating.
Coconut oil makes the chocolate coating easier to dip and helps it set with a delicate snap when chilled. Cocoa butter is another option if you prefer a chocolate coating without coconut flavor.
Equipment Needed
- Large mixing bowl
- Electric hand mixer or stand mixer
- Rubber spatula
- Measuring cups and spoons
- Small microwave-safe bowl or heatproof bowl
- Baking sheet or flat tray
- Parchment paper
- Sharp knife
- Fork or dipping tool
- Refrigerator or freezer
A candy-bar mold is optional. If you do not have one, you can spread the filling into a lined container and cut it into bars after chilling.
Step 1: Prepare the Baking Tray
Choose a baking sheet or flat tray that fits comfortably in your refrigerator or freezer. Line it with parchment paper, making sure the paper lies flat so that the candy bars can be lifted away easily after chilling.
If you are using a rectangular container instead of a tray, line the container with parchment paper and leave a little extra paper hanging over the edges. This will help you lift the chilled filling out in one piece.
Make sure all your equipment is clean and dry. Water can cause melted chocolate to seize, becoming thick and grainy, so keep moisture away from the chocolate coating.
Place the prepared tray in the refrigerator while you make the filling if you want the bars to chill slightly faster after shaping.
Step 2: Prepare the Cream Cheese Mixture
Place the softened cream cheese in a large mixing bowl. Beat it with an electric mixer for approximately 1–2 minutes until it looks smooth, creamy, and free from lumps.
Add the powdered keto sweetener, unsweetened cocoa powder, vanilla extract, salt, and optional espresso powder.
Start mixing at a low speed to prevent the cocoa powder from escaping the bowl. Once the ingredients begin to combine, increase the speed slightly and continue beating until the mixture becomes evenly chocolate-colored.
Scrape down the sides of the bowl with a rubber spatula. Pay particular attention to the bottom of the bowl, where small pieces of cream cheese or dry cocoa powder may remain.
Taste a tiny amount of the mixture and adjust the sweetness if needed. Remember that the final chocolate coating will add more richness, so the filling should taste pleasantly chocolatey without being excessively sweet.
If the mixture appears unusually stiff, allow it to sit for a few minutes at room temperature and beat it again briefly. Avoid adding too much liquid, because a loose filling will be difficult to shape into candy bars.
Step 3: Whip the Heavy Cream
Pour the cold heavy whipping cream into a separate, clean mixing bowl.
Using an electric mixer, beat the cream at medium speed until it begins to thicken. Continue beating until firm peaks form when you lift the mixer attachments.
The cream should hold its shape without looking grainy or separating. If you see butter-like clumps or liquid separating from the cream, it has been overwhipped.
Cold cream is important because it whips more easily and retains air more effectively. For particularly warm kitchens, you can chill the mixing bowl and beaters for about 10–15 minutes before starting.
The whipped cream supplies the airy texture that makes the filling resemble a chocolate nougat rather than a dense chocolate truffle.
Step 4: Make the Optional Gelatin Stabilizer
For candy bars that need to hold their shape particularly well, gelatin can help stabilize the mousse filling.
Place 1 tablespoon of cold water in a small heatproof bowl. Sprinkle 1 teaspoon of unflavored gelatin evenly over the water and allow it to stand for approximately 5 minutes so that the gelatin absorbs the liquid.
Warm the gelatin gently in short microwave intervals or over a bowl of warm water until it becomes liquid. Do not boil it.
Allow it to cool until it is still liquid but no longer hot. Mix a spoonful of the cream cheese mixture into the gelatin first, then gradually stir this tempered mixture into the remaining cream cheese mixture.
This gradual approach helps prevent gelatin strands or lumps from forming.
The gelatin is optional. If you prefer a softer, mousse-like center and plan to keep the candy bars refrigerated, you can leave it out. If you want firmer bars that are easier to dip, it can be useful.
Step 5: Fold the Whipped Cream into the Chocolate Mixture
Add approximately one-third of the whipped cream to the chocolate cream cheese mixture. Stir gently to loosen the chocolate mixture and make it easier to combine with the remaining cream.
Add the remaining whipped cream in two portions. Use a rubber spatula to fold it in gently, moving the spatula down through the center of the bowl, along the bottom, and up over the mixture.
Rotate the bowl as you fold, repeating the movement until the filling is evenly colored.
Avoid vigorous stirring. The air incorporated into the whipped cream is what makes the candy center light and fluffy, so excessive mixing can make the filling dense.
The finished filling should look like a thick chocolate mousse. It should be smooth enough to spread but firm enough to retain its shape when chilled.
If the mixture seems too soft, place it in the refrigerator for 15–20 minutes before shaping. If it seems too dense, check that the cream was properly whipped and folded in without losing too much air.
Step 6: Shape the Candy Bars
Transfer the chocolate filling to the prepared parchment-lined tray.
For classic rectangular bars, spread the filling into a rectangle approximately 1–1.5 cm thick. A rectangular container makes this particularly easy because it helps keep the edges straight.
Smooth the surface with a spatula and gently press the mixture into the corners. Try to maintain an even thickness so that all the pieces chill at approximately the same rate.
Alternatively, spoon the filling into silicone candy-bar molds and level the tops. This method creates more uniform bars and reduces the amount of trimming required later.
Place the tray in the freezer for approximately 45–90 minutes, or until the filling is firm enough to cut without collapsing. Freezer times depend on the thickness of the filling and the temperature of your freezer.
If you prefer to chill the filling in the refrigerator, allow approximately 2–4 hours or until it is sufficiently firm.
The goal is not to freeze the filling solid for long-term storage at this stage. You simply want it firm enough to handle during the chocolate-dipping process.
Step 7: Cut the Filling into Individual Bars
Once the filling is firm, lift it from the tray using the parchment paper. Place it on a cutting board and use a sharp knife to cut it into 8–10 rectangular bars.
For a traditional candy-bar shape, aim for bars approximately 7–9 cm long and 2–3 cm wide, adjusting the dimensions to suit the size of your mixture.
Wipe the knife with a clean, warm, slightly damp cloth between cuts if the edges begin to look rough. Dry the knife thoroughly before continuing so that excess water does not reach the chocolate coating later.
If you prefer smaller treats, cut the mixture into bite-sized rectangles. Smaller pieces can be easier to dip and are convenient for portion control.
Place the cut bars back on the lined tray and return them to the freezer for another 15–30 minutes. They should be firm and cold before dipping, which helps the chocolate coating set quickly and evenly.
Step 8: Melt the Sugar-Free Chocolate
Place the chopped sugar-free chocolate or chocolate chips in a dry, microwave-safe bowl. Add 1 tablespoon of coconut oil or cocoa butter.
Microwave in 15–20-second intervals, stirring thoroughly after each interval. Continue until the chocolate is almost completely melted, then stir until the remaining pieces disappear.
Alternatively, place the chocolate and oil in a heatproof bowl over a saucepan containing gently simmering water. Ensure the bottom of the bowl does not touch the water, and keep steam and water droplets away from the chocolate.
Once melted, the chocolate should be glossy and fluid enough to coat the bars without becoming excessively thick.
If it is too thick for dipping, add a little more coconut oil, approximately 1 teaspoon at a time, and stir thoroughly. Avoid adding water, milk, or cream to the coating, as these can cause the chocolate to seize or change the way it sets.
Allow the melted chocolate to cool briefly until it is warm and fluid rather than hot. Very hot coating can soften the cold mousse centers too quickly.
Step 9: Dip Each Bar in Chocolate
Remove only a few chilled filling bars from the freezer at a time. Keeping the remaining bars cold will help them maintain their shape.
Place one bar on a fork or dipping tool and lower it into the melted chocolate. Use a spoon to pour chocolate over any exposed areas until the bar is completely covered.
Lift the bar carefully and allow the excess chocolate to drip back into the bowl. Gently tap the fork against the side of the bowl if needed to remove excess coating.
Slide the coated bar onto the parchment-lined tray. You can use a second fork or a small spatula to help release it without damaging the chocolate shell.
Repeat the process with the remaining bars.
If the coating begins to thicken while you work, warm it very briefly and stir until fluid again. If the filling begins to soften, return the undipped bars to the freezer for several minutes before continuing.
For a thinner, more delicate shell, let the excess chocolate drain thoroughly before setting the bars on the tray. For a thicker shell, allow the first layer to set and dip the bars a second time.
Step 10: Decorate the Chocolate Bars
Decoration is optional, but a few simple finishing touches can make the homemade candy bars look more polished.
While the chocolate coating is still wet, you can sprinkle a very small amount of unsweetened cocoa powder, finely chopped sugar-free chocolate, or a tiny pinch of flaky salt over the top.
For a classic appearance, leave the bars plain and smooth.
For a decorative finish, reserve a small amount of melted chocolate and drizzle it over the coated bars once the first layer has begun to set.
Keep any additional ingredients keto-friendly by checking their labels for added sugar and carbohydrate content.
Step 11: Chill Until the Chocolate Shell Sets
Place the tray of coated bars in the refrigerator for approximately 20–40 minutes, or until the chocolate shell feels firm.
If the bars are being prepared in a warm kitchen, you may need a little longer. Avoid leaving the mousse filling at room temperature for extended periods because it contains dairy.
Once the coating has set, carefully lift each bar from the parchment paper.
For the best texture, allow a refrigerated bar to sit at room temperature for approximately 3–5 minutes before eating. This slightly softens the chocolate shell and lets the mousse center become creamy without allowing the filling to become warm.
The finished bars should have a firm chocolate exterior and a soft, airy chocolate interior.
Step 12: Taste and Check the Texture
Cut one bar in half to inspect the center.
The filling should look evenly chocolate-colored, without visible pockets of unmixed cream cheese. It should feel light and creamy rather than hard or chewy.
The chocolate shell should hold together when the bar is picked up. A thin shell may crack slightly when bitten, which is normal for a chilled chocolate coating.
If the center is too soft to handle, return the remaining bars to the refrigerator or freezer for a little longer. If it tastes too rich, serve smaller portions or use a slightly less intense chocolate coating next time.
Because this recipe uses a mousse-style filling rather than the commercial candy’s exact industrial nougat formula, the result will be creamier and more delicate than a packaged 3 Musketeers bar.
Estimated Nutrition Information
The nutritional values below are estimates for one bar when the recipe makes 10 bars. Actual values depend on the brands of cream, chocolate, sweetener, and other ingredients used.
| Nutrient | Estimated amount per bar |
|---|---|
| Calories | 150–210 |
| Total fat | 13–19 g |
| Protein | 2–4 g |
| Total carbohydrates | 5–10 g |
| Fiber | 1–3 g |
| Estimated net carbohydrates | 2–7 g |
These estimates are illustrative, not laboratory-verified nutrition facts. For an accurate count, add the nutrition information for your exact ingredients and divide by the number of bars produced.
To calculate net carbohydrates, subtract dietary fiber and any qualifying sugar alcohols according to the product label and the method appropriate to your dietary plan. Not all sugar alcohols have identical effects on digestion or blood glucose, and individual responses vary.
Important Tips for the Best Keto-Friendly Candy Bars
Use powdered sweetener. Powdered sweetener blends into the filling more smoothly and helps prevent a gritty texture. If your sweetener is granulated, you can grind it into a fine powder using a clean blender or spice grinder.
Keep the cream cold. Cold heavy cream whips more successfully, producing a lighter and more stable filling.
Soften the cream cheese properly. Cream cheese that is too cold may leave small lumps in the filling. Let it soften before beating, but do not leave dairy ingredients out for extended periods.
Fold instead of stirring aggressively. Gentle folding preserves the air in the whipped cream and gives the center its characteristic mousse-like texture.
Chill the bars before dipping. Cold, firm bars are easier to handle and help the coating set quickly.
Avoid overheating the chocolate. Gentle melting helps produce a smoother coating and reduces the risk of scorching or separation.
Choose chocolate carefully. Some products labeled sugar-free still contain carbohydrates, so check the nutrition label and ingredient list.
Make the bars uniform. Similar sizes help ensure even chilling and make the portions easier to calculate.
Use a little oil to adjust the coating. A small amount of coconut oil or cocoa butter improves fluidity, but too much can make the shell softer at room temperature.
Common Problems and How to Fix Them
Problem: The filling is too soft.
The whipped cream may not have reached firm peaks, or the filling may need more chilling time. Refrigerate it longer before shaping. If you plan to transport the bars, consider using the optional gelatin stabilizer.
Problem: The center is dense rather than fluffy.
The whipped cream may have been underwhipped or folded in too vigorously. Whip the cream to firm peaks and fold it into the chocolate mixture in stages.
Problem: The chocolate coating is too thick.
Warm the coating gently and mix in a small amount of coconut oil or cocoa butter. Add it gradually to avoid making the shell too thin.
Problem: The chocolate coating cracks.
The bars may be extremely cold when dipped, or the chocolate layer may be too thick. Let the bars sit for a minute or two after removing them from the freezer and use a thinner coating.
Problem: The coating slides off the filling.
The filling may have developed condensation, or the coating may have been too hot. Keep the filling cold but dry, and let the melted chocolate cool slightly before dipping.
Problem: The filling tastes too bitter.
Increase the powdered sweetener slightly or choose a less intense cocoa powder. Remember that very dark chocolate can contribute additional bitterness.
Problem: The sweetener feels gritty.
Use a finely powdered product and mix it thoroughly with the cream cheese before folding in the whipped cream.
Flavor Variations
Classic dark chocolate. Use a rich sugar-free dark chocolate coating and vanilla in the center for a flavor closest to a traditional chocolate candy bar.
Milk chocolate style. Choose a sugar-free milk chocolate suitable for your carbohydrate target. The result will be sweeter and creamier.
Mocha chocolate. Add the optional espresso powder to the filling for a deeper chocolate flavor. The coffee flavor should be subtle rather than dominant.
Salted chocolate. Add a tiny pinch of flaky salt over the coating before it sets. The salt balances the sweetness and highlights the cocoa flavor.
Peanut butter chocolate. Swirl a small quantity of unsweetened, no-added-sugar peanut butter into the filling. This changes the classic flavor and may increase the carbohydrate content, so adjust the nutrition calculation.
Mint chocolate. Add a small amount of peppermint extract to the filling. Start with just a drop or two because peppermint extract can become overpowering quickly.
Coconut chocolate. Add a little unsweetened, finely shredded coconut to the filling if you enjoy a coconut texture. This variation will be less similar to the original candy bar, and its carbohydrate content will depend on the quantity used.
Storage Instructions
Store the finished candy bars in an airtight container in the refrigerator. Because the filling contains whipped cream and cream cheese, keep the bars refrigerated at or below 40°F (4°C) and avoid leaving them at room temperature for more than 2 hours, or 1 hour in temperatures above 90°F (32°C).
For best quality, aim to eat the refrigerated bars within 3–4 days. Discard them sooner if they develop an unusual smell, appearance, or texture.
To freeze them, arrange the bars in a single layer until firm, then transfer them to a freezer-safe airtight container with parchment paper between layers. They are best used within approximately 1–2 months for quality.
Thaw frozen bars in the refrigerator rather than on the counter. The texture of the mousse and chocolate shell may change slightly after freezing and thawing, but they should remain enjoyable if properly stored.
Frequently Asked Questions
Can I make these keto-friendly 3 Musketeers bars without gelatin?
Yes. Gelatin is optional. The bars can be made with whipped cream and cream cheese alone, although they will have a softer, more mousse-like center and may require additional chilling.
Can I make them without cream cheese?
You can experiment with a filling made from whipped heavy cream and cocoa, stabilized with gelatin, but it will be less reliable and may not hold its shape as well. Cream cheese provides structure and helps the filling remain stable.
Can I use regular chocolate?
Yes, but regular chocolate usually contains added sugar and may increase the carbohydrate content considerably. If you are following a strict ketogenic diet, choose a sugar-free chocolate whose nutrition information fits your daily carbohydrate target.
Are these candy bars completely sugar-free?
Not necessarily. They can be made without added sugar by choosing suitable ingredients, but dairy naturally contains some carbohydrates, and sugar-free products may contain sweeteners or other carbohydrate sources. Check the labels of all ingredients.
Can I make the bars ahead of time?
Yes. Prepare them a day ahead and store them in an airtight container in the refrigerator. They are also suitable for freezing in individual portions.
Are these suitable for children?
They can be served as an occasional homemade dessert if the ingredients are suitable for the child. Keep in mind that some sugar alcohols can cause digestive discomfort, particularly in larger portions.
Can I make this recipe dairy-free?
A dairy-free version would require suitable plant-based whipping cream, a dairy-free cream cheese alternative, and dairy-free sugar-free chocolate. The filling may have a different flavor and texture, and some alternatives do not whip or stabilize as reliably as dairy cream.
How do I make the bars taste more like the original?
Focus on a light, airy chocolate center, a smooth chocolate shell, a mild vanilla flavor, and a relatively thin coating. Avoid adding nuts or other strong flavors if you want to preserve the classic candy-bar character.