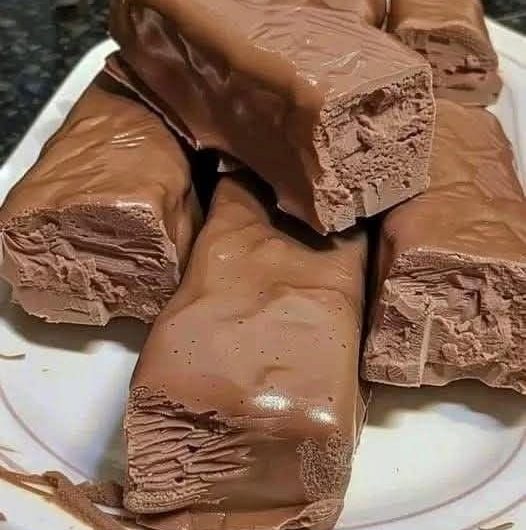
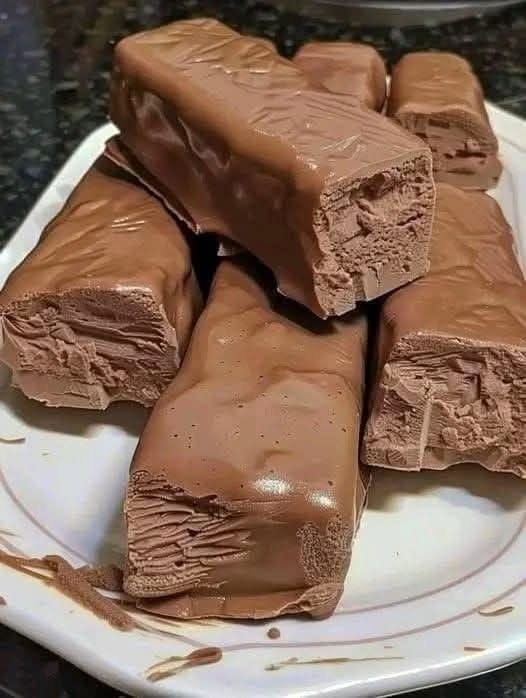
If you are looking for an easy low-carb dessert that feels like a real chocolate treat, this Easy Keto Chocolate Nougat Candy is a great choice. It combines creamy coconut, rich chocolate, and a touch of monkfruit sweetener to create a homemade candy that is simple to prepare and convenient to keep in the refrigerator or freezer. The texture is soft and chewy inside, while the chocolate coating adds a satisfying finish.
Homemade keto candy can be much easier than it sounds. This recipe does not require an oven, complicated candy-making equipment, or advanced cooking skills. The coconut mixture is prepared in one bowl, shaped into small bars, chilled until firm, and then covered with melted sugar-free chocolate. Because the preparation is straightforward, it is a useful recipe for anyone beginning a low-carb or keto-style lifestyle.
The combination of unsweetened desiccated coconut and coconut cream gives these candy bars their distinctive coconut flavor and rich texture. Coconut oil helps hold the mixture together and adds additional richness, while monkfruit sweetener provides sweetness without relying on traditional granulated sugar. Once the coconut centers are chilled and coated with chocolate, they become an indulgent homemade treat that can be enjoyed whenever a sweet craving appears.
Why This Keto Chocolate Candy Is Worth Making
One of the biggest advantages of this recipe is its simplicity. There is no baking time involved, and most of the work consists of mixing, shaping, chilling, and dipping. That makes these homemade keto chocolate bars particularly useful when you want a dessert without spending a long time in the kitchen. The recipe also makes multiple small portions, so you can prepare them once and enjoy them over several days.
These coconut chocolate bars are also easy to prepare in advance. After the chocolate coating has hardened, the candies can remain chilled until you are ready to serve them. Keeping them cold helps the coconut center maintain its shape and keeps the chocolate shell firm. This makes the recipe suitable for meal preparation, holiday dessert trays, or simply keeping a homemade low-carb snack available at home.
Another appealing feature is the contrast between the two layers. The coconut center has a soft, dense texture, while the chocolate coating provides a firmer outer layer. Together, they create a candy-like bite without requiring a complicated confectionery process. If you enjoy the flavor combination of coconut and chocolate, this recipe gives you a simple way to recreate that pairing in your own kitchen.
The Coconut Filling
The filling is the heart of this keto candy. Coconut cream, coconut oil, unsweetened desiccated coconut, and monkfruit sweetener are mixed together until they form a thick and sticky mixture. The desiccated coconut absorbs some of the moisture from the coconut cream while providing the texture needed to shape the mixture into individual pieces.
It is important to mix the ingredients thoroughly so the sweetener and coconut cream are distributed evenly. You want the mixture to hold together when pressed or shaped. If it appears too loose or wet, the texture can be adjusted with a little additional desiccated coconut, as mentioned in the notes. The finished mixture should be firm enough to handle without falling apart.
The coconut cream also contributes to the rich mouthfeel of the filling. Rather than producing a dry coconut center, it helps create a softer texture. Coconut oil works alongside the cream to provide structure once the mixture is chilled. When these ingredients are combined and refrigerated or frozen, they create a center that is much easier to coat with melted chocolate.
Choosing the Chocolate Coating
The chocolate layer gives these homemade keto coconut bars their finished candy appearance and adds the deep cocoa flavor that balances the sweetness of the filling. The recipe calls for 7 ounces of sugar-free chocolate chips or chocolate with high cocoa solids, allowing you to select a chocolate that fits your preferred flavor and dietary approach.
When melting the chocolate, gentle heating is important. A double boiler provides controlled heat, while a microwave can also be used in short intervals. If using a microwave, heating for around 20 seconds at a time and stirring between intervals helps prevent the chocolate from becoming overheated. The goal is a smooth, fluid chocolate that is easy to use for dipping.
If your melted chocolate is too thick, the recipe notes that one teaspoon of coconut oil can be added to make it smoother. This can make dipping easier and help create a more even coating around each coconut bar. The chocolate should be melted completely before you begin coating the chilled centers.
How to Shape the Coconut Bars
After mixing the coconut filling, scoop portions and shape them into small rectangles approximately 2–3 inches long. Keeping the pieces reasonably similar in size helps them chill and coat more evenly. You do not need professional candy molds to make this recipe; your hands and a parchment-lined tray are enough.
For a more uniform appearance, you can use a silicone mold or an ice tray. Press the coconut mixture firmly into each cavity so the filling holds its shape. This method can be especially useful if you are preparing the candy for guests or want every piece to look consistent.
Once shaped, place the coconut pieces on a parchment-lined tray. They should then be transferred to the freezer for approximately 20–30 minutes. Chilling is an important part of the process because firmer coconut centers are much easier to dip into melted chocolate without breaking apart.
Dipping the Coconut Centers in Chocolate
When the coconut bars have become firm, prepare the melted chocolate. Carefully dip each chilled piece into the chocolate, making sure the surface is well covered. A fork is useful for lifting the coated candy from the chocolate while allowing excess coating to drain back into the bowl.
Do not rush this stage. Allowing excess chocolate to drip away before placing each piece on the tray helps prevent large pools of chocolate from forming around the candy. Once coated, return each bar to the parchment-lined tray. The chocolate will begin to set as the candy becomes colder.
The final chilling period usually takes around 10–15 minutes in the refrigerator or freezer. Once the coating has hardened, the candies are ready to serve. The result is a rich chocolate-covered coconut treat with a texture that makes it feel much more elaborate than the preparation actually is.
Easy Ways to Customize the Candy
Although the basic recipe is delicious on its own, the notes provide several simple ways to adjust the flavor. A small amount of vanilla extract or almond extract can be added to the coconut mixture for additional aroma and depth. Because these flavors are concentrated, only a small amount is needed.
For an almond-inspired variation, place a whole almond on top of each coconut bar before dipping it in chocolate. This creates a candy reminiscent of classic almond-and-coconut combinations. If you prefer a simpler coconut flavor, leave the almond out and keep the original chocolate-and-coconut pairing.
Vegan chocolate can also be used when appropriate, giving the recipe a dairy-free and vegan-friendly direction. When selecting chocolate, always check the product label because sugar content and ingredients can vary considerably between brands.
Making the Recipe Beginner-Friendly
This recipe is particularly suitable for beginners because there are only a few important stages to manage. The first is getting the coconut mixture to the right consistency. It needs to be sticky and compact rather than runny. The second is chilling the shaped centers sufficiently before dipping. Firm centers are easier to handle and less likely to crumble in the melted chocolate.
The final stage is melting the chocolate correctly. Chocolate can become difficult to work with if it is overheated, so short heating intervals and frequent stirring are helpful. If the chocolate becomes too thick, the small amount of coconut oil suggested in the recipe can improve its consistency.
Using parchment paper also makes cleanup easier. It prevents the chocolate-covered candy from sticking directly to the tray and provides a convenient surface for chilling. Once the chocolate has completely set, the bars can be transferred to a suitable container for storage.
Storage and Serving
These keto chocolate coconut bars are best kept chilled. Refrigeration helps the coconut filling stay firm and prevents the chocolate coating from becoming overly soft. They can be served directly from the refrigerator when you want a firmer texture, or allowed to sit briefly at room temperature before eating.
The freezer is also useful for longer chilling or for preparing the candy ahead of time. If you freeze the bars, allow them to soften slightly before serving if you prefer a less firm texture. Store them in a covered container to help protect the chocolate surface and maintain their quality.
Because the recipe produces 20 servings, the individual pieces are conveniently portioned. This makes them useful for keeping track of dessert portions while still enjoying something rich and satisfying. Their small size also makes them suitable for serving on dessert platters or alongside coffee.
Notes for the Best Results
If the mixture is too wet
If the coconut mixture does not seem firm enough to shape, add a little more desiccated coconut. The additional coconut will absorb moisture and make the mixture easier to handle. Mix thoroughly and check the consistency again before shaping.
For extra flavor
Vanilla extract or almond extract can be added for a different flavor profile. Use only a small amount so the additional flavor does not overpower the coconut and chocolate.
If the chocolate is too thick
When the melted chocolate is difficult to use for dipping, stir in 1 teaspoon of coconut oil. This can help loosen the chocolate and create a smoother coating.
For an almond variation
A whole almond can be placed on each coconut piece before it is dipped in chocolate. This provides an almond-and-coconut variation inspired by classic chocolate coconut candies.
Keep the candy chilled
Chilling is helpful throughout the preparation process. Firm coconut centers are easier to dip, while refrigerated finished candies maintain a better texture and cleaner chocolate coating.
What Makes This a Convenient Low-Carb Dessert?
Traditional candy often contains substantial amounts of added sugar, which is one reason homemade alternatives can be appealing to people following a lower-carbohydrate eating pattern. This recipe uses monkfruit sweetener and sugar-free chocolate or high-cocoa chocolate instead of relying on conventional sweetened chocolate.
However, the exact carbohydrate content of the finished candy can depend on the specific brands of coconut cream, chocolate, and sweetener used. Product labels can differ, particularly with sugar-free chocolate products. If you are carefully tracking carbohydrates, calculate the final nutritional values using the exact ingredients and brands you use.
The combination of coconut and chocolate also makes the candy feel satisfying in a small portion. Instead of needing a large dessert, one small bar can provide the rich flavors associated with chocolate coconut candy. That makes these homemade treats convenient for planned portions and occasional sweet cravings.
Easy Keto Chocolate Nougat candy
 Recipe by admin1
A simple no-bake keto chocolate candy made with creamy coconut filling, unsweetened desiccated coconut, monkfruit sweetener, and a rich sugar-free chocolate coating.
20
servings15
minutes126
kcal15
minutesIngredients
½ can coconut cream (tinned)
¼ cup coconut oil, melted
2 cups unsweetened desiccated coconut
2 tablespoons monkfruit sweetener
7 ounces sugar-free chocolate chips or chocolate with high cocoa solids
Directions
- Line an 8-inch square baking pan with parchment paper. A silicone mold or ice tray can also be used if you want evenly shaped pieces.
- Add the coconut cream, melted coconut oil, unsweetened desiccated coconut, and monkfruit sweetener to a medium mixing bowl.
- Stir the ingredients together thoroughly until they form a thick, sticky mixture. Make sure the coconut and sweetener are evenly distributed throughout the mixture.
- Scoop portions of the coconut mixture and shape them into small rectangles approximately 2–3 inches long. If using a silicone mold or ice tray, press the mixture firmly into the individual cavities.
- Place the shaped coconut pieces on the parchment-lined tray and transfer them to the freezer. Chill for 20–30 minutes, or until the centers are firm enough to handle easily.
- Meanwhile, melt the chocolate using a double boiler or microwave. If using a microwave, heat it in 20-second intervals and stir between each interval until completely smooth.
- Remove the chilled coconut bars from the freezer. Dip each piece into the melted chocolate, making sure the coconut center is thoroughly coated.
- Lift each chocolate-covered bar with a fork and allow excess chocolate to drip back into the bowl.
- Place the coated bars back on the parchment-lined tray.
- Transfer the tray to the refrigerator or freezer and chill for another 10–15 minutes, or until the chocolate coating has fully hardened.
- Once set, serve the homemade keto chocolate nougat candy immediately or keep it chilled for later.
Notes
- If the coconut mixture is too wet to shape, mix in a little more desiccated coconut until it becomes easier to handle.
- For additional flavor, add a small amount of vanilla extract or almond extract to the coconut mixture.
- If the melted chocolate is too thick for dipping, stir in 1 teaspoon of coconut oil.
- Vegan chocolate can be used for a low-carb vegan option when suitable.
- For an almond-inspired variation, place a whole almond on each coconut bar before dipping it in chocolate.
- Keep the finished bars chilled for the best texture and easier handling.
Nutrition Facts
- Total number of serves: 1
- Calories: 127kcal
- Fat: 12g
- Carbohydrates: 7g
- Fiber: 5g
- Protein: 1g